Mike New Bearing for Technics 1210 Turntable
I must confess I was a bit worried when I ordered a Mike New Bearing for the Technics 1210 turntable i’m experimenting with from David at Mains Cables R Us as I’m certainly no 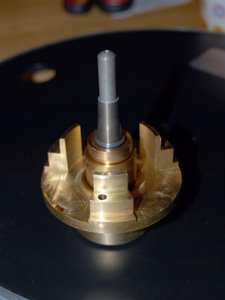 DIYist and it seemed there’d be quite a bit of fiddling to do to fit the new bearing – but I’d fitted the Origin Live PSU without too much hassle so how hard could it be?

I needn’t have been quite so worried (read on) – if you can drive a screwdriver and are not afraid of attacking the circuit board on the 1210 with nail clippers and a tiny file then you should be OK.
The UK price for the Mike New bearing is £445 from the guys at Mains Cables R Us.
First off a bit of description of the bearing – It’s a weighty 500 grams, it’s made of brass and it looks like… a bearing. In comparison to the standard Technics 1210 bearing it certainly looks far better made and far more substantial – see picture below.


The bearing housing (the brass bit) is machined from a solid billet of brass and has three locating points where it is bolted to the main chassis of the turntable. The bottom of the housing is a little larger than the Technics’ bearing housing with the intention of offering maximum contact (stability) between it and the turntable chassis.
The spindle is slightly longer than the standard spindle by 3mm and this allows the use of aftermarket mats and clamps etc. The whole of the load (platter, record, puck) is supported on an 8mm Silicon Nitride ball which “floats” in a 6mm deep cylindrical cavity and it ultimately rests on a 3mm solid carbide pad – now you don’t actually get to see any of this as its all in a large sealed well filled with a synthetic oil at the bottom of the bearing housing. OK, that’s the techy bit (no pun intended) over and done with you’ll be pleased to know.
Fitting
I thought it would be a useful exercise to actually go through the whole fitting procedure so that those of you out there thinking about this as a potential upgrade path for your Technics 1210 could see if it was beyond the scope of your DIY/fettling skills. MCRU say the fitting of the new bearing will take five minutes (I think this is very optimistic) but they have a fitting service available should you not feel up to the job.
The instructions that come with the bearing are printed over three and a bit sides of A4 and are clear and easy to follow, though I suggest you familiarise yourself with the procedure mentally before beginning to actually get inside the Technics.
I’ll assume you know the 1210 a little and have had the good sense to remove the Perspex lid, have secured the tonearm and fitted a stylus guard to your cartridge.
First off you remove the top platter from the turntable by placing a finger from each hand in the two holes and lifting straight upwards. Then remove the round black plastic cover by removing the five screws around its edge – I’d previously removed this from the turntable when fitting the Origin Live external PSU so didn’t need to do this bit.
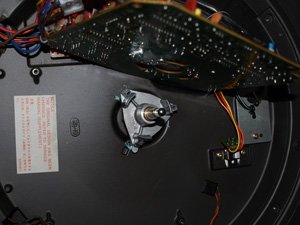
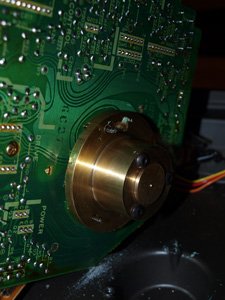
Now you’re presented with the inner workings of the turntable, namely a large printed circuit board to which there are three plugs with wires coming from them attached (see picture). You need to detach these plugs carefully from the circuit board – they are quite tight but do come out with a bit of gentle persuasion.
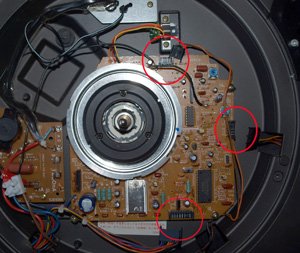
The circuit board now needs to be disconnected from the chassis and to do this you unscrew and remove three self tapping screws. I used a Phillips screwdriver and had no problems but you are supposed to use a posidrive screwdriver.
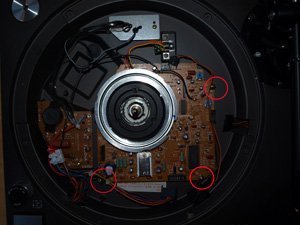

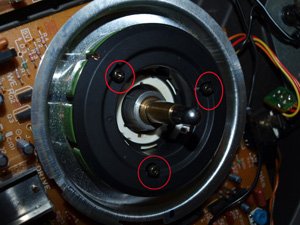
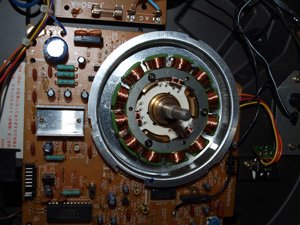
Around the motor coil assembly are three black screws and you now need to remove these. These are the screws that connect the bearing to the body of the turntable chassis and are pretty long as you’d expect. Now you can tilt the circuit board to the left and remove the old bearing. As I was doing this I actually thought that all this was a bit too easy and going far too well! There’s a black plastic cover over the motor coil thingy and apparently this is of no use so can be removed – again it’s a tight fit but does come out.

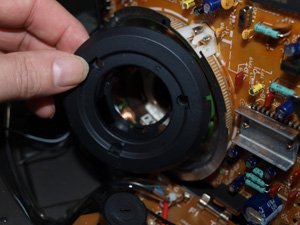
You can now remove the old bearing.
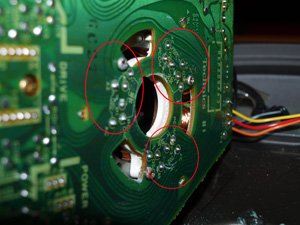
Now this is the important bit and the bit where I was always going to flounder. I could tell this as this section of the instructions was printed in heavy type in a “whoop whoop ignore at your peril” sort of way. On the underside of the circuit board you’ve got three groups of six wires which stick out of solder (see picture below) and you’ve got to snip these wires right back to avoid shorting once the new bearing is fitted. I used a set of nail clippers to do this and whilst I got the wire cut as short as possible this later proved not enough – in short I fitted the new bearing and ended up with a platter that didn’t turn due to the wires shorting with the new bearing. The trick here is that you MUST file each of the wires you’ve snipped right down so barely nothing protrudes – ignore this at your peril!
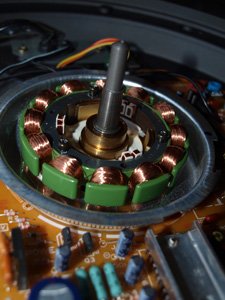
You’re now ready to fit the new bearing which is a pretty simple job of pushing it through the hole in the PCB, screwing the three long black bolts through the bearing and onto the chassis, rescrewing the PCB with the three posidrive screws and refitting the three circuit plugs you earlier removed (the ones with the wires). Almost there.
Add a few drops of the supplied oil to the reservoir at the top of the spindle, add a bit of Vaseline or silicone grease to the spindle itself and replace the platter. Jobs a goodun!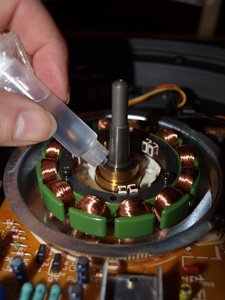
Listening
The Technics I have was a good condition second hand unit and up until the bearing being fitted I’d added an Origin Live external PSU, feet and mat, plus an OL Silver arm and a Audio Technica 33EV cartridge.
Once the bearing was fitted I put the turntable on the shelf and left it running constantly for a few days as recommended in the instructions – they say 30 hours but I gave it a good deal longer.
Eventually sitting down and listening to the 1210 with the new bearing I was immediately confronted with a sound that was clearly an improvement over the original bearing. There is instantly a feeling that something is very much improved in the overall presentation. A feeling of solidity.
Listening to Concerto Aranjuez (John Zavardin/Philomonia of London) there is a sensation of there being a greater amount of space between instruments in the orchestra – I know this is clichéd but there’s more of a sense of listening in three dimensions to the music. This piece sounded really huge with each instrument and group of instruments being perfectly “visible” in the stereo image and with each instrument having its place in that space – both left and right and forward and back – a walk in kind of quality perhaps. Guitar notes appear to be a good deal better defined than with the standard bearing and with a somewhat more detailed quality to them when listening closely.
Bass guitar on Israel Vibration’s “Jericho” feels to be more precise in its portrayal and with a tighter more hard-hitting element to its structure – more real bass guitar sounding if you like. Again there is an impression that the soundstage is more defined in space and has a more rock solid base to it – the image is constant and doesn’t drift.
Putting on the brilliant “Techno Picker” by Adrian Legg you get to hear every little detail of his fingers on the fret-board as well as a very good feel that it is indeed an Ovation electro-acoustic he’s playing. There’s a cleaner feel to the way the music is heard and it’s as if another layer of detail has been opened up across the frequency range – “lifting of a veil” hyperbole is taking it too far into hifi pundit jibber jabber but you get my meaning I’m sure.
Popping Yello’s “Stella” album onto the platter what hits first is clearly a very 80s production to the album (ther’s a better insight into the recording with the new bearing) and that soundstaging thing again is very much in evidence. Drums are hard hitting and precise, bass is deep and defined and there’s an overall balance to the sound. Good stuff!
Conclusion
The replacement bearing for the Technics 1210 was a bit of an eye opener for me – I’m on a journey with the turntable to see just what is capable from the humble DJ spinner (which I consider to be an excellent motor unit and chassis by the way) and was expecting some slight improvements, but this upgrade is certainly a tad more than subtle.
Of course I’ve done other upgrades to the Techy prior to fitting the Mike New bearing, but at each step I’ve carefully analysed the upgrades and reported on what each of the upgrades brought to the party.
I’d say that the bearing offers a significant improvement in performance, way above and over that of the standard bearing and so if you’re looking to take the 1210 to another level it should certainly be on your shortlist of things to add sooner rather than later.
What you are left with is a turntable motor unit that offers a very high level of performance and (when matched with a suitable arm, cartridge, power supply, mat and feet) something I think will give many mid to high-end turntable a good run for their money.
I know there are folk out there in Hifi-Land that don’t see the point on spending what is a considerable amount of dosh on the 1210, but what you get with sensible and worthwhile upgrades is to my ears a very good turntable indeed that once fettled is pretty much plug and play.
This is certainly an item that I would consider pretty much obligatory for those serious in getting the very best from the Technics 1210 and I heartily recommend it. 
Author – Stuart
How we carry out reviews.
Read more Hifi Review.