Silver and Gold – The Mundorf Effect Part 1
Dan Worth looks at the effects of swapping out crossover components in his Ayon Seagull C loudspeakers. Not so much a review but a personal journey of exploration of what can be achieved by improving what is already there and of particular interest to those interested in DIY Audio.
Working hard to get your system correct in terms of synergy and room interaction is always a matter of ongoing efforts. What may sound correct one day at a specific moment in time with a specific genre of music can often become after prolonged listening to just not cut the mustard at all. We buy and try various new components and speakers, try to balance tonality with different brands of cables and attempt to clean the sound with equipment racks and isolation supports.
What if I told you that there is another route to explore that will open a whole new area of technical and aural exploration, but could indeed also prove to be a cost-effective solution in some cases?

Now as no surprise to our American readers and many on the continent, modifying our system components can have huge benefits over selling them on and losing a fortune to only then spend an additional small fortune to upgrade, or as is the case in many cases sidestep – attempting to better our current sound. The U.K. has been a little slower than many other countries to cotton on to the potential of modifying existing equipment, with a handful of companies showing up over the past few years and offering such services. Myself, I’ve always been interested in updating and upgrading my equipment, but I don’t have the technical knowledge to perform the calculations necessary to reform a circuit such as a speaker crossover or to cut and remaster a PCB in my electronics for maximum effectiveness.
I’ve been lucky enough to have a small group of friends both personal and in the industry, who can offer specific information on redesigning and implementing key upgrades, which in large has been extremely effective on overall sound quality and most importantly my wallet.
I started off initially by implementing aftermarket power supplies and building my own cables many years ago, with good levels of effectiveness and as time has gone on with some real perseverance and still limited knowledge I have a system today that far exceeds its credentials in comparison to its off-the-shelf performance.


The main focus around this write-up is to assess and convey what potential performance increases are gained using Mundorf’s Silver Gold products within my Ayon Seagull C – all ceramic Accuton based driver speakers. The products will include Silver Gold Capacitors, Inductors, Resistors, Wiring and accessories.
Firstly though, I will take you on the journey of the changes I initially made to the speakers with more modestly priced component changes and my slow yet informative progression to higher priced components and their benefits – before moving on to Mundorf’s bespoke Silver/Gold products and my review of them in this two-part write-up.
My speakers have been a project in the making for a fair few years now, using various levels and price-points of components (mostly Mundorf) as well as having them re-veneered, isolated and complimented with the addition of super-tweeters.
Assessing Current Speaker Performance
When approaching a project such as this there is a requirement to be confident in the speakers; just like any other component in your system, you need to be happy that their integration of drivers and crossover points produce a cohesive performance. For me, the potential of my Accuton driver’s performance superseded the crossover components which came as standard from the factory. I had already noted that the same drivers were already being used on speakers costing triple the price of my own. I was also happy with my room’s response and general integration.
The issues I had with my speakers in standard form was primarily with the tweeters, they would often sound hard and whispy – a little edgy and bright. There was a clear lack of solidity in the upper-end and a lack of overall control, resulting in a less than natural presentation, with a somewhat mechanical or digital hardness. Midrange was always pretty exceptional with any amplification I had used and although smoother sounding valves amps paired well, I felt that I was lacking upper-end transparency in the trade-off for a more tamed treble. The ceramic drivers really have always excelled on projecting vocals, if not for a trade-off in depth, with a slight lack of depth complexity when it comes to multiple artifact positioning. Bass was always tight and fast, yet slightly lacked a richer tonality and overall extension in exchange for upper-bass attack.
In their standard form, Ayon had promoted the speakers as coming with “custom made Mundorf crossovers”, something that more and more companies are championing these days. Although there is some validity in this statement as the crossovers were indeed custom tuned to the drivers and cabinets by the Ayon technicians, all parts were in fact, off-the-shelf and implemented to cost, though they were indeed Mundorf components. What I did admire once getting inside the speaker was how simple and clutter free the crossover design was. There had been great care and extensive listening done in order to complete the circuitry in such a minimalistic way, which in turn made me and my “solder slave” very happy. I have an eye condition that leaves me with partial sight, so a good friend of mine would come over frequently to implement the modifications I’d decided on for the crossover upgrades, as well as the various other modifications I often make in my electronics.
The crossover is a 2nd order design, with some response shaping on the bass section (an inductor partially bypassed by a resistor), this means the inductor allows low frequencies through and the resistor allows a limited amount of higher frequencies through. Which then feeds into the standard second order low pass section of the crossover. The tweeter has an attenuating resistor before the high pass section.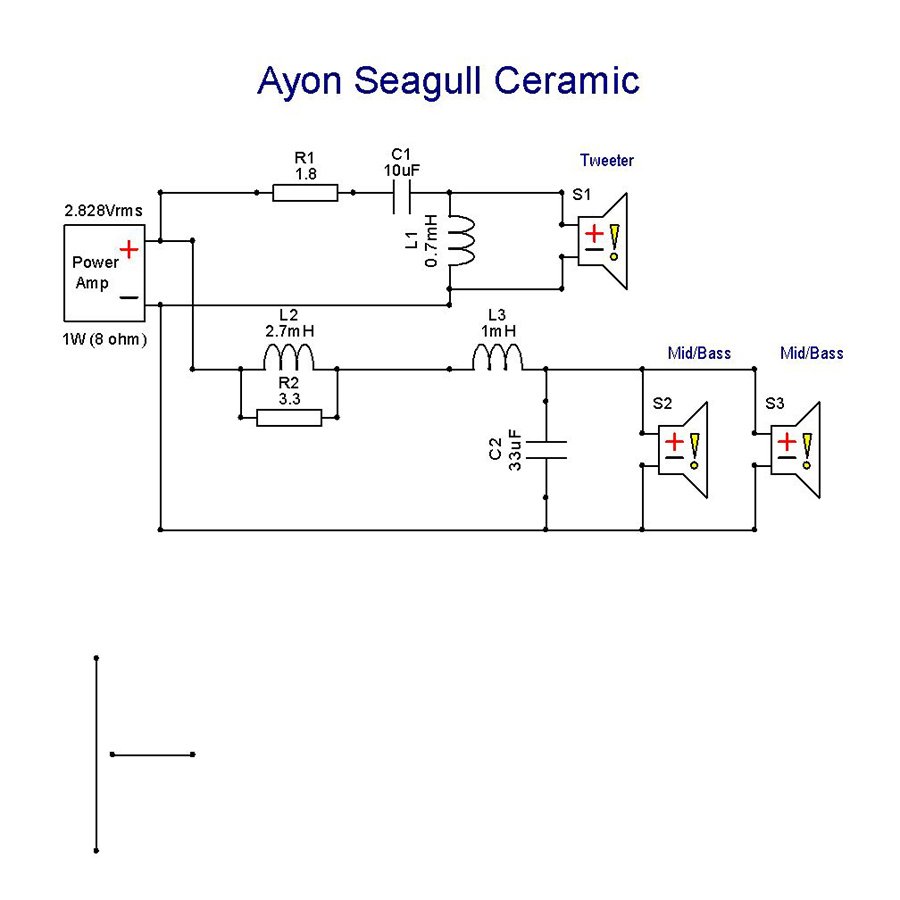
The most reasonable option in performing upgrades, especially when you are not very technically minded on crossover design, is to look to swap the components out value for value but using better components. The capacitors installed from new were Mundorf MKP throughout, air core and ferrite inductors and Mundorf’s basic MOX resistors – although a far better compliment than many other speakers there was potential room for improvement.
Capacitor values can be broken down into values which accumulate to the same overall value using a range of capacitor types and brands to give a presentation of combined sonic traits, but this is an absolute minefield, and unless you have large stocks to play with, common sense and a more simplistic approach is suggested for beginners.
The Beginning Of The Changes
My initial planned changes were to swap out the capacitors in the speakers. Research and previous experience in changing power supply caps proved to have the most profound effects. My choice was to upgrade to the Mundorf EVO Oil caps – the EVO Oils are a reasonably cheap upgrade. I First changed the cap on the mid/bass circuit in just one speaker. On listening, there was a clear lean to one side of the soundstage, with more pronunciation from the speaker with the new cap in. So, the same was applied to the second speaker – where balance was found, but now I was in the position where the tweeter sounded less forward and the sound sat behind the mid/bass and struggled to engage cohesively.
Addressing this by installing the same caps in the tweeter circuit value for value brought everything back in balance. Although definition and detail were increased, my tweeters still had that whispyness I described earlier during testing. I gained more body and density to the treble, but it still lacked a degree of control.
With a little more research in hand and some good advice, I opted to try some Mills resistors across the whole crossover network. This helped, but I was still not convinced by the presentation; I felt as if the Mills had simply laid a hint of colour, masking over everything – less hard sounding now, but sacrificed leading edge clarity and definition. The Mills are a smooth sounding resistor, but I wanted to obtain greater transparency and control rather than smoothing out the nasties so that they grated on me less – liken it to blowing a high pitched whistle and then blowing it again under your jacket.
To combat this and to try and obtain some form of balance I opted to try some Mundorf Supreme caps, the standard kind. Very pleasingly the combination of the Mills along with the Supremes was offering a far better balance, a wider and more open soundstage and great depth in comparison to the EVOs. Leading edges were better defined, sharper, with less haze, and the small amounts of roundness balanced the tweeters to make them far more listenable and more sophisticated. After some extensive listening over the following month or so I still had a slight whisp and break-down in the top-end of a strong female vocalist, especially at higher volume levels and with busier music containing more aggressive notes in the treble area -this would pinch my eardrums at times and put out uncontrolled, rough distortions. The overall improvements at this stage in comparison to stock were vast and I was becoming addicted to the potential and real cost-effective benefits of the improvements over the thousands spent in other areas of my system.
I actually sat with this combination for a good couple of months, allowing time for the new components to run in before making any rash decisions. I had a visit from a couple of industry professionals that work in the Pro Audio/Studio sector and who also produce products for Hifi/Home Audio use (both engineers and company owners) and they had a new suggestion to make.
The current wiring inside the speakers was Shunyata 1.25mm solid core copper in a plaited geometry. The suggestion was to use a heavier gauge cable on the tweeter to give less resistance to the ceramic diaphragm and allowing it to breath more freely. The cable used was actually stranded copper of a very pure variety, which also contained a small amount of pure silver strands too, designed by one of these guys – Michael Whiteside under the Studio Connections brand – who is a physicist and who’s cables I use predominantly in my system. I admire the combination of science and real-world testing that is used to produce them, so was confident in the suggestion – plus the same cable is used by the other guy in his own brand of speakers, which have been used in some serious studios as well as on Broadway.
The very instant the wire changes were made the tweeters came on song and any harshness that remained subsided dramatically. I didn’t have the complete richness in tone I have now after more updates, but the improvements allowed for some real controlled clarity to emerge from the upper frequencies for the first time. I found that female vocalists such as Rachelle Farrell and Lorena McKennitt could get carried away and really wail without pinning me to the ceiling at high volumes. Result!
My experience with the Mills resistors and their very discernible sonic signature gave to the sound was on my mind for a while afterwards – I thought, if a simple cable change was able to make this much difference to the tweeter and knowing that the Mills gave a smoother offering to things, my brain was saying, would a more transparent sounding resistor in the treble now be applicable and would the tweeters open up further, but without sounding too explicit?
Continued research brought me to Dueland, a company that I’ve heard wonderful things about over the years, but also a company that sell components that cost eye-watering amounts. Their resistors, which are often championed on DIY forums and people were telling me “Having a Dueland resistor in a circuit, is like having no resistor at all”, suits me I thought. My goal as I said is to obtain absolute transparency with as much tonal quality and control as I possibly can.
So, a couple Dueland resistors of the same value later and the Ayons were put back together and listened to. Oh no, was my first thought, have I chosen or been sent the wrong values? Checking my invoice and the resistors themselves this proved not to be the case. What had happened was that the Dueland resistors sounded as if they had so little resistance that the treble was simply overpowering, not in the sense of harshness but in their perceived volume or dB level – I can’t listen to this I thought, disjointed was an understatement. They completely took away the treble/mid/bass cohesive balance. My thoughts were that I obviously, I needed to get matching resistors for the mid/bass to bring the levels to a balance again and then work from there.
The most satisfying thing when I did install the Duelands all around was that I was so confident that any other changes made anywhere in the speakers would now be heard so easily and it was at this point where I began to feel excited about the journey ahead.
The definition I now had allowed the Mundorf Supreme Caps to really show their sonic signature, smooth, detailed and exploring a wider deeper soundstage with far better extension. The same was true for the Accuton drivers, they gained speed and poise, with more accurate control of leading edges and with a freer and more open decay.
When I had changed the internal wiring inside the Ayons, it was suggested to me to try some of the newer ClarityCap MR caps, so I picked up a full set and installed them. The differences between the MRs and the Supremes were surely noticeable. The Mundorfs’ had a slightly warmer flavour and the ClarityCaps were definitely cleaner. The MRs didn’t have the depth of the Supremes, but imaging on both sets was absolutely brilliant. The MRs for me would have suited a larger paper cone-based speaker, whereas, in my situation with the ceramic drivers and their sonic signature, I just loved the Mundorf Supremes as they gave a balance of tonal preference along with better depth and insight to the image – they sound more mature and elegant but still know how to conduct a beat.
My First Contact With Mundorf
I initiated conversations with Mundorf soon after this and we talked about the benefits of capacitors utilising different materials and structures. Up until now, I had only used three of their caps with each being an entry-level cap from of each of their ranges, predominantly using aluminium foil, with the EVOs being soaked in oil – a small step up from the plain aluminium version they offer and which I had used previously in amplifiers.
We also discussed the benefits of re-wiring speakers, a simple upgrade that many of us have made over time. I had been using Mundorf’s Silver/Gold wire for some years, in various cables and also as internal hookup wire and have always greatly favoured it over pure silver conductors. The tonality obtained from the mixture of the two precious metals gives the extensive detail obtained from good quality silver, with more of the tonality of an ultra-pure copper wire – the combination is an absolute wonder and my choice of wire for any DIY project, such as my huge 50kg Balanced AC/DC Power Supply (which I may also write about at some point) as well as the many cable designs I have made over the years.
With the increased performance I had found by changing from the Shunyata wire to the Studio Connections, especially with regards to taking away the whispyness of the tweeters, I decided that I wanted to pursue other elements, such as the inductors prior to another re-wire. So, I will look again at this when we come to the second part of this write-up which will be focused on Mundorf’s Silver/Gold products.
Things got interesting here for me again. Interesting in the sense that advice I had been given previously from a couple speaker designers was that inductors, as long as they are at correct values really don’t make much difference to performance. Of course, me being me I was sceptical, to say the least – I couldn’t see why companies such as Mundorf and others would produce such a vast range of inductors if their performance differences were negligible. My conclusion has always boiled down to try it for yourself and make your own decision Dan, along with the notion “will the rest of the electronics or speakers be competent enough to expose the attributes of such an upgrade?”, which is something that causes many people to fail to understand the benefits of some system changes/upgrades. You have to have good components to begin with to appreciate other changes in the chain.
A lot of reading from multiple sources and some further conversations with other professionals and Mundorf themselves, left me very confident that if I was to purchase a set of new inductors I would indeed value the benefits in my speakers.
Mundorf offered me four upgrade paths to choose from, each being an upgrade to my current inductors and all options either copper wire-based or copper foil based. I opted for copper wire-based rather than foil. My plan was to allow myself to identify the benefits of an inductor combination which on paper far exceeds my stock inductors and go from there.
The inductors were of the air core varieties which are baked in hard wax, two of which were discs roughly two inches in diameter by roughly an inch thick and the other a 3kg four inch squared cube.
Installing the inductors required my entire crossover (which sits in the base of my speakers on a separate plate) to be completely removed and reseated, mainly due to the size of the larger inductor, but also due to the requirements of inductors’ placement in relation to one another. Inductors, being a coil will generate an electromagnetic field, these fields need to be offset from each other by 90 degrees. The most obvious configuration was to turn one on its side, the next laid flat and the next on its side and also twisted 90 degrees. The method is very commonly known and will be something that anybody wishing to do component upgrades will come across very quickly during any research into these types of modifications.
The new inductors had an immediate effect on my sound. Mainly adding body to the entire frequency range, under-pinning tonality and lending each and every instrument, as well as vocals, some real distinguished tone, body, and timbre. The sound compared to stock was just so much more natural now with the entire combination of modifications. Spatial awareness gained a good few notches in performance and my background is far more silent, allowing inner detail to really shine. Over the past couple of months, the masses of metals have had the opportunity to settle in and run in and the entire picture has become more intimate and effortless, with better conveyance and attention to intricacies of micro-details and micro-dynamics. It is like adding superior tyres to a sports car, allowing the power to connect to the tarmac more efficiently.
My advice through my experiences, and as someone who initially only concentrated on the external upgrades and changes that off the shelf products, is for anybody wishing to upgrade their crossovers to treat them just like a power supply or cable upgrade – purchase values of the same spec as the current, buy components within budget, start with a linear approach from a reputable company and work from there. Just like a power supply upgrade, you will need to retain electrical values, and just like cable upgrades you will find that cables from the same manufacturer will synergistically work, or like many of us, you may do some further research and add a cable or two from another company. You can go exotic, just like cables, but for price against performance… crossovers are, in my personal experience, where some real benefits can be made to an already established competent system.
Dan Worth